Back End Test
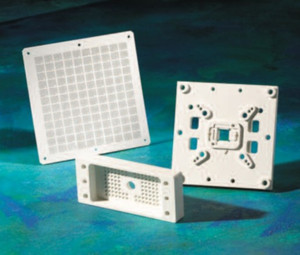
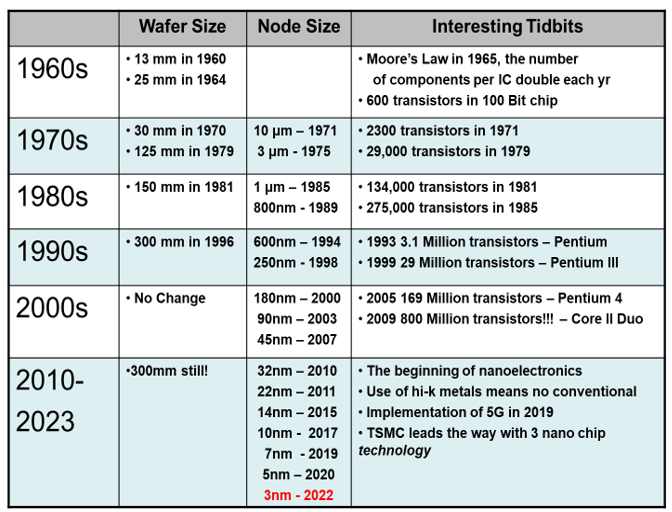
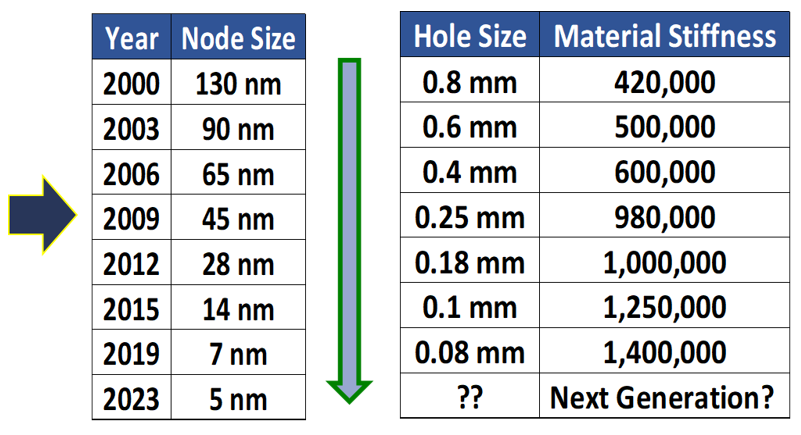
Likely no segment of Semiconductor that relies on plastic materials has been more effected by Moore’s Law & the constant miniaturization of the IC chip than the Back End Test Socket application. As the chip node size continues to decrease the machined features required to test the devise decreases as well.
This requires materials that are matched to the machining requirements of the socket with out sacrificing or in some cases increasing the dimensional stability of the finished socket. The issue for the resin developer is that the more micro-machinable the material, the less dimensionally stable the material, thus this creates a rheological teeter-totter effect.

As mentioned, the two critical variables in selecting a material for a Back End Test applications are:
- Micro-machinability
- Dimensional Stability of the finished socket
The following describes the properties critical to each variable leading to the selection of an optimum material.
Dimensional Stability
Dimensional stability for Test Sockets refers to the ability of the socket to hold its integrity over the test parameters and after being machined. The following three properties are important to consider when selecting a material for an application where dimensional control is required.
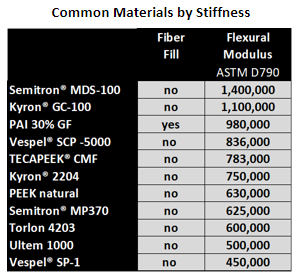
- Flexural Modulus - Flexural Modulus of Elasticity (ASTM D790) measures a material’s ability to resist bending or a measure of the material’s stiffness. Driven by increasing hole counts in array patterns, decreasing pitch sizes & decreasing material between holes coupled with decreasing cross sections, materials that are stiffer are desired. Stiffness is often the most critical factor in the selection of a material.
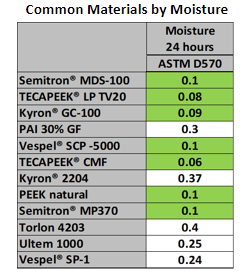
- Moisture Absorption - in plastics (ASTM D570) measures the weight gain of a plastic specimen at 23°C at 24 hours and to saturation. The relevance to test applications is the isotropic growth of the application after machining due to exposure to humidity.
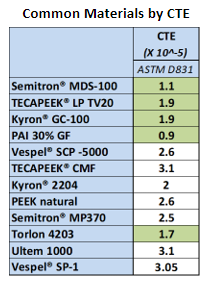
- Coefficient of Thermal Expansion (CTE) - the measure of the change in length or volume per unit rise in temperature. The relevance to Test Socket materials is that testing is often done over a broad temperature range, thus, the hole placement moves more for materials with higher CTE values.
Micro-machinability
Micro-machinability refers to the ability to machine ever decreasing features. These features are mostly hole patterns called array patterns, which can be over 1,000 micro holes. Holes sizes can range from as large as 0.4mm down to 0.08mm or even smaller. What matters isn’t just the capability to create holes, but also the skill to achieve precise positioning and produce clean through holes. Materials have limitations, and thus, selection for the machinability of a given pattern is critical. The three key properties for the selection of materials for micro-machinability are:
- Glass Transition Temperature & Melt Temperature – Micro hole drilling involves high speeds & extremely small drill bits that generate a high level of surface frictional heat. The higher the thermal resistance of a material, the cleaner the hole upon exit of the drill bit, commonly referred to as burring.
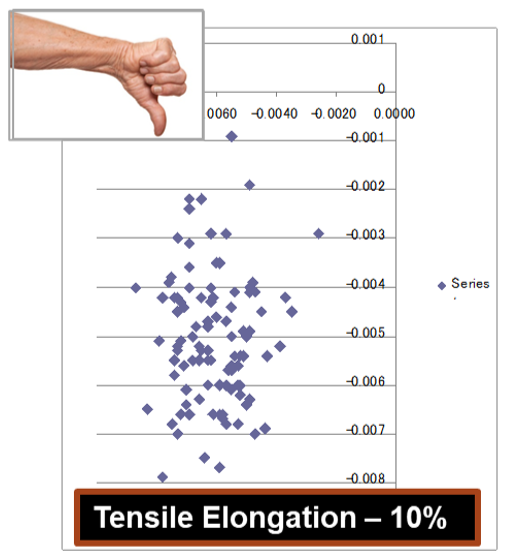
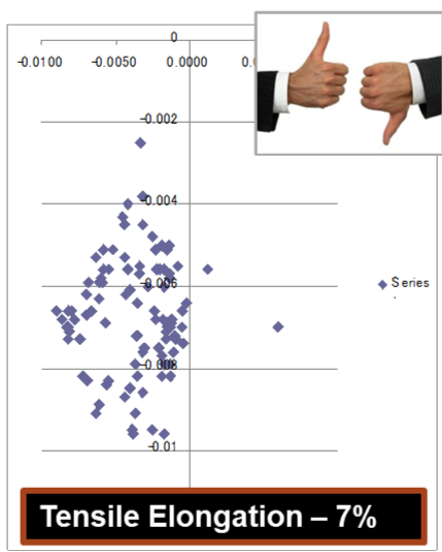
- Tensile Elongation at Break (ASTM D412) – measures a material’s ductility expressed in percent stretch before the break. Low ductility refers to a brittle material, while high ductility equates to a material that is generally stretchable. Testing on the capability to Place Holes With Accuracy shows that the lower the ductility or the more brittle the material, the better the material for precision hole placement
- Filled Materials – Micro-machinability requires precise machining; precise machining is enhanced when drilling through a homogeneous medium. One way to create more dimensionally stable materials is to add filler such as fiber or powders. These fillers detract from the ability to control micro machined features.
Tensile Elongation vs Hole Placement Accuracy
